Adding anchor links on your website can make it easier for visitors to find important sections without scrolling through the entire page. These links jump directly to specific areas, which improves how users navigate your site and makes their experience more efficient.
Using Elementor, you can set up these anchor links by assigning unique IDs to sections and linking to them. This process works well for different parts of your page and can also be added to navigation menus for quick access.
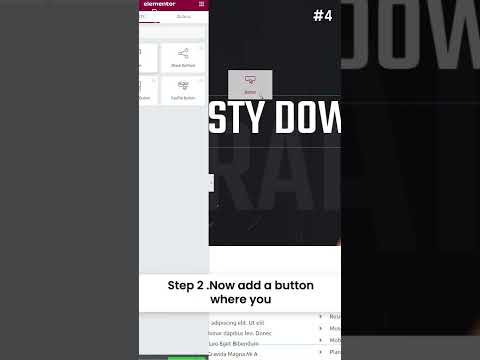
In this guide, we’ll walk you through the process of how to add Elementor jump to section with anchor links, step by step.
Key Takeaways
- You can jump to specific sections on your page with anchor links.
- Setting up anchor links requires creating IDs and linking to them.
- Anchor links can be added to menus for easier navigation.
What are Anchor Links in Elementor?
Anchor links in Elementor let you navigate directly to a particular section on a page. They’re especially helpful for pages with extensive content.
In Elementor, you can create anchor links by assigning a unique ID to a specific section of your page, then linking to that ID from elsewhere, either on the same page or from a different one.
The anchor acts as a distinct identifier that you apply to any section.
When someone clicks the link, they’re instantly taken to the exact part of the page you’ve targeted.
This approach can enhance your website’s user experience by helping visitors quickly locate the content they need.
How to Add Elementor Jump to Section with Anchor Links in 2 Easy Steps
Here’s a simple 2-step method to create jump-to-section links in Elementor using anchor links:
Step 1: Set Up a CSS ID for Your Section in Elementor
To create an anchor link in Elementor, assign a CSS ID to the section you want to navigate to.
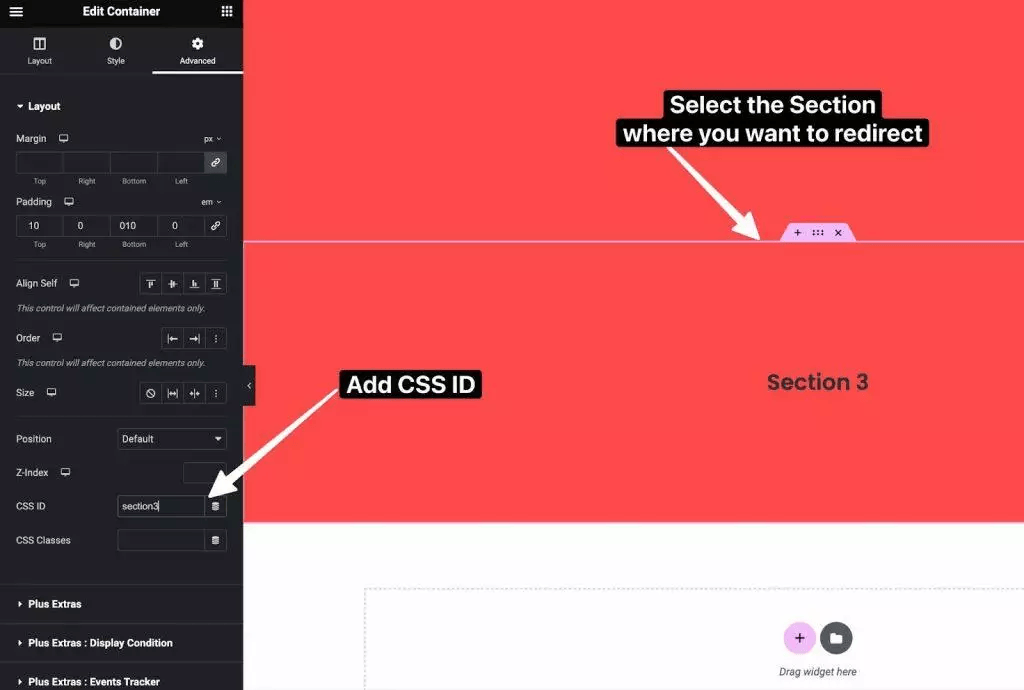
Steps to Create an Anchor Link in Elementor Using a CSS ID:
- Open the page or post you want to edit in the Elementor editor.
- Add a section to the page by clicking the plus (+) icon, then choose a structure to insert a new section.
- Select the section by clicking the section handle (six dots icon) to open its settings.
- In the settings panel, go to the Advanced tab.
- In the CSS ID field, enter a unique name for your anchor (use only letters, numbers, hyphens, or underscores, don’t include the # symbol).
- Click Update to save your changes.
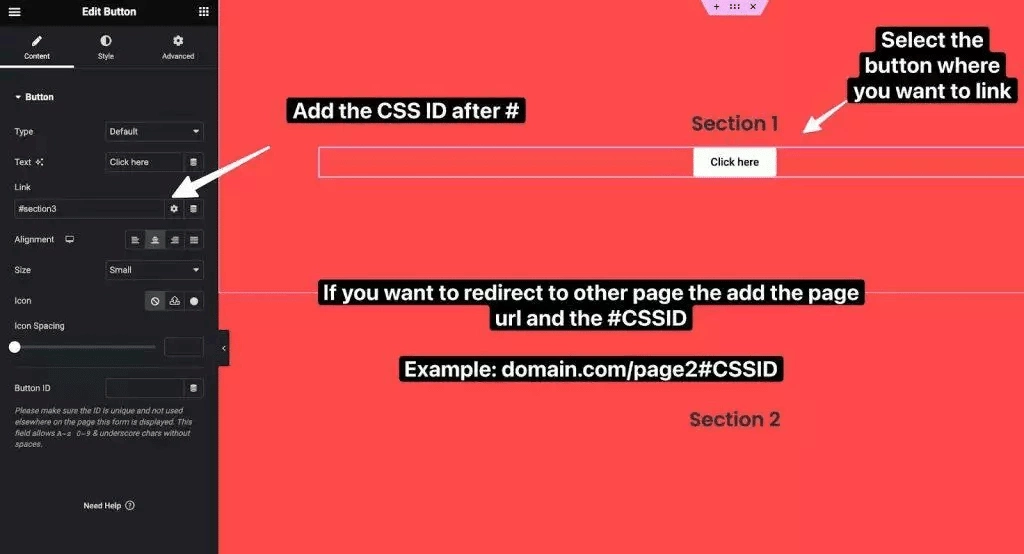
Step 2: Link an Element to the Anchor Using a CSS ID
To create an anchor link, you’ll need to assign a CSS ID to the target element, the one you want to jump to when the link is clicked.
Follow these steps:
- Select the element (e.g., section, widget, or column) you want to scroll to.
- Open the Advanced tab in the Elementor editor.
- In the CSS ID field, type a unique identifier (use only letters, numbers, hyphens, or underscores, no # symbol).
- Save your changes by clicking Update.
Now that the element has a CSS ID, you can create a link pointing to that ID to enable anchor-style navigation.
Creating Anchor Link URLs in Elementor
- To link to a section on the same page, use this format:
#CSSID
Replace CSSID with the exact name of the CSS ID you assigned (no spaces or # symbol in the ID itself). - To link to a section on a different page, use this format:
https://example.com/page/#CSSID
Replace example.com/page with the full URL of the target page, and CSSID with the anchor ID you created.
By connecting links to CSS IDs in this way, you enable smooth navigation that helps users jump directly to specific sections of your website, improving the overall user experience.
Setting Up Anchors for Different Elements in Elementor
If you want to create jump links to specific elements on your page using anchors, you’ll need to assign a unique CSS ID to each target element. Here’s how to do it for various elements.
Case 1: Elementor Text Box
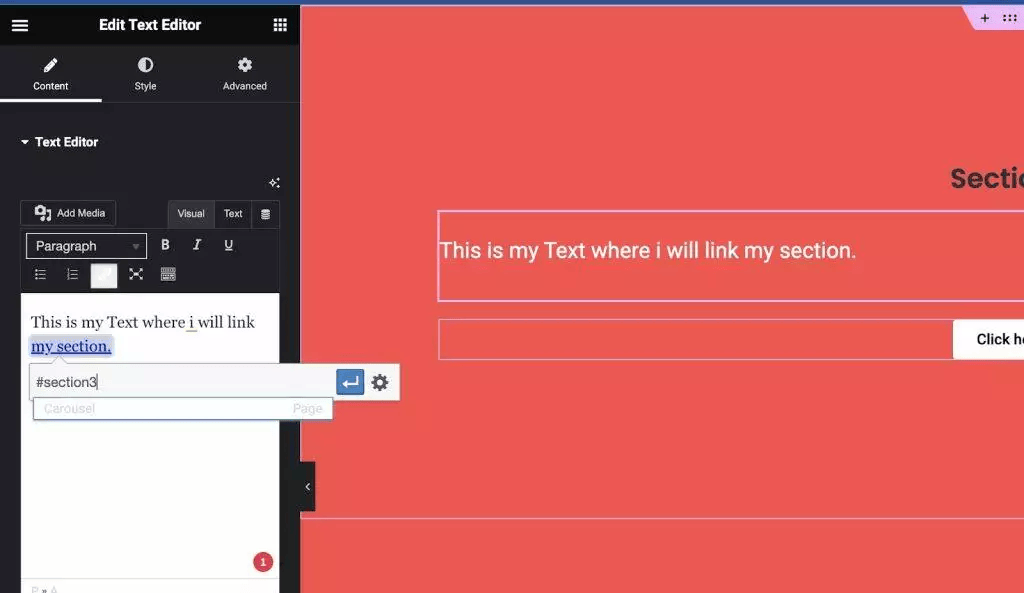
To set up an anchor for a Text Box in Elementor:
- Add a text box (Text Editor widget) to your page or post.
- Click on the text box to select it.
- In the left panel, go to the Advanced tab.
- In the CSS ID field, type a unique ID (letters, numbers, hyphens, or underscores only—no spaces or #).
- Click Update to save your changes.
You can now link to this text box using #YourCSSID.
Case 2: Elementor Image
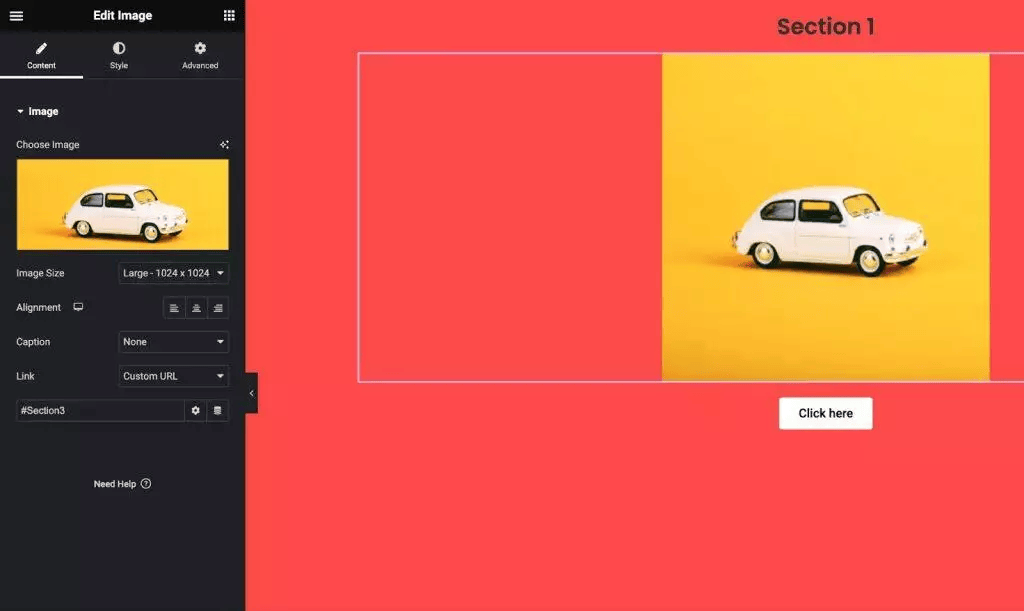
To create an anchor link targeting an Image in Elementor:
- Add an image to your page or post using the Image widget.
- Select the image by clicking on it.
- In the left panel, open the Advanced tab.
- In the CSS ID field, enter a unique ID (use only letters, numbers, hyphens, or underscores).
- Click Update to save your changes.
You can now link to this image using #YourImageID.
Case 3: Elementor Button
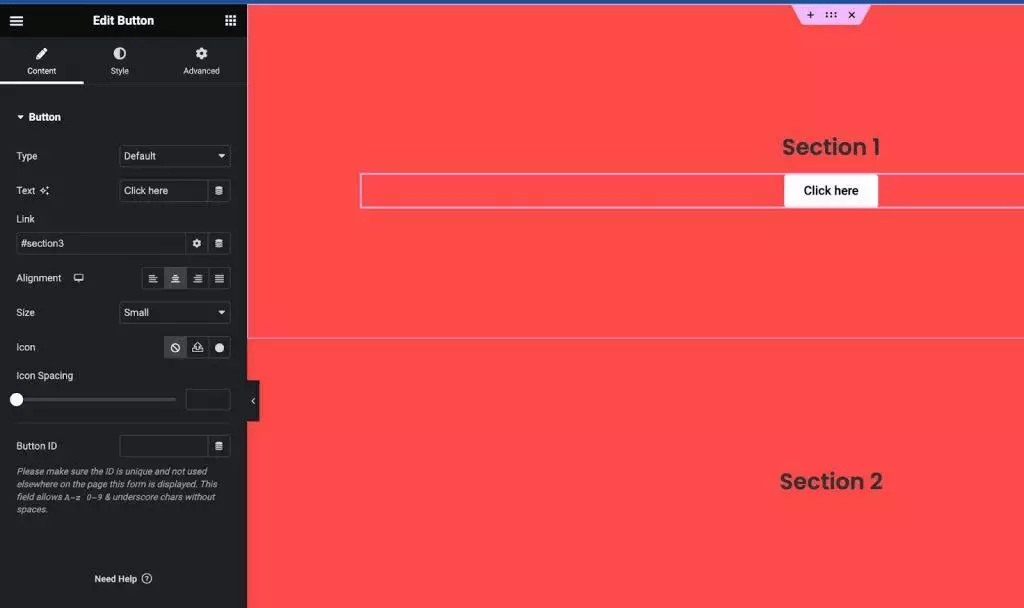
To create a jump link using a Button in Elementor:
- Add a button widget to your page or post.
- Select the button by clicking on it.
- In the left panel, go to the Content tab.
- Enter the button’s text (the label you want users to see).
- In the Link field, type the URL of the page you want to link to, followed by # and the CSS ID of the target section (for example: https://example.com/page/#sectionID or just #sectionID for the same page).
- Click Update to save your changes.
You can use this method to link any element to a specific section by using the #CSSID format.
Case 4: One Page Scroll Navigation
To implement this on your WordPress site, you’ll need the One Page Scroll Navigation widget from The Plus Addons for Elementor.
Below is a step-by-step guide on how to use this widget effectively.
How to Add Anchor Links to Elementor Navigation Menus
Incorporating anchor links into your Elementor navigation menus enhances user experience by enabling visitors to quickly jump to specific sections of your page with a single click.
Follow these steps:
- Create an Anchor Link
Drag the Menu Anchor widget to the top of the section you want to link to in Elementor. Give the anchor a unique name, like services or contact-us. - Create a WordPress Menu
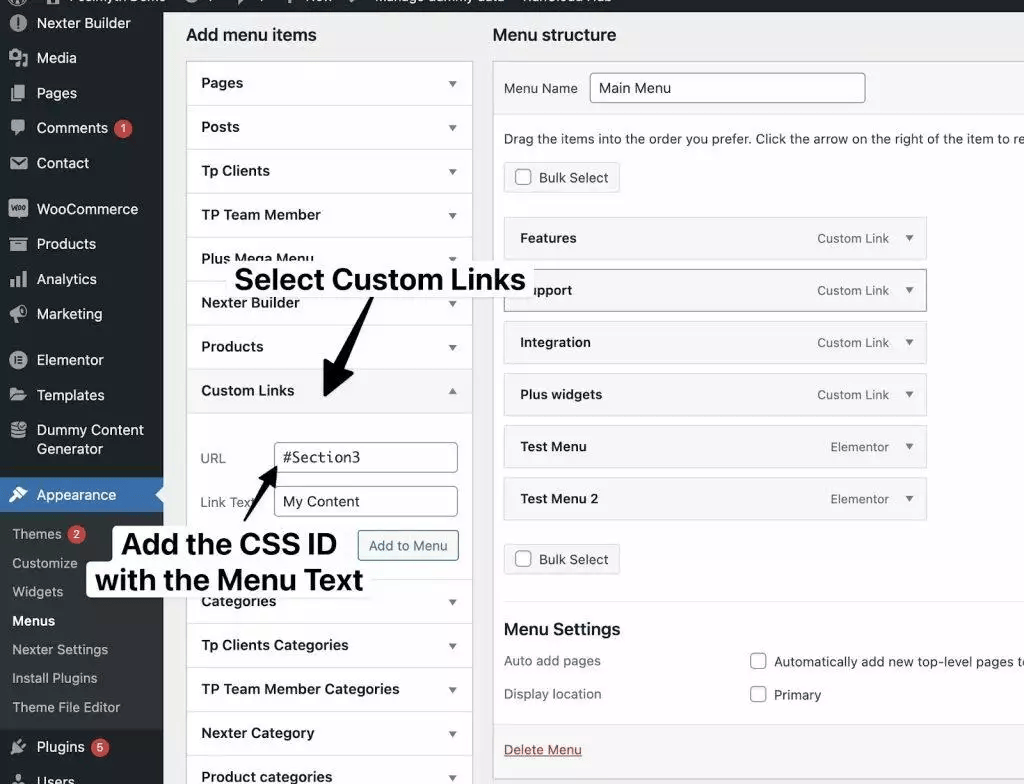
In your WordPress dashboard, go to Appearance > Menus. Create a new menu by giving it a name and clicking Create Menu. - Add a Custom Link Menu Item
On the left, click the Custom Links tab. In the URL field, enter # followed by the anchor name you created (e.g., #services). Add a label for the menu item, then click Add to Menu. - Save Your Menu
Once you’ve added all your anchor link items, click Save Menu. - Add the Menu to Your Elementor Template
Return to the Elementor editor and add the Navigation Menu widget to your page. Select the WordPress menu you just created. Your anchor links will now be clickable from the navigation menu.
By implementing anchor links in your navigation, visitors can effortlessly find the sections they want, enhancing their browsing experience. Give it a try and see the difference on your website!
How to Create Anchor Links to Different Pages in Elementor
If you want to link to a specific section on a different page using Elementor, you can do this easily by using the Menu Anchor widget.

Follow these simple steps:
- Add the Menu Anchor widget to the section you want to link to on the target page.
- Create the link URL by combining the page URL with the anchor name, using this format:
www.yoursite.com/about-us#contact-us
Replace the URL and anchor name with your actual page and anchor IDs. - Add the link to your text or button by pasting the full URL (from step 2) into the Link field in the widget settings.
And that’s it! Your button or text will now jump directly to the specified section on a different page.
Creating anchor links across pages is an easy way to improve navigation and help visitors quickly find the content they’re looking for.
BONUS: How to Turn On Smooth Scrolling for Jump Links
If you want to improve your website’s user experience, adding smooth scrolling to jump sections is an excellent idea.
Smooth scrolling allows visitors to navigate your site fluidly, avoiding abrupt jumps or jerky transitions.
To enable smooth scrolling for your anchor links, simply add a small piece of CSS code to your website.
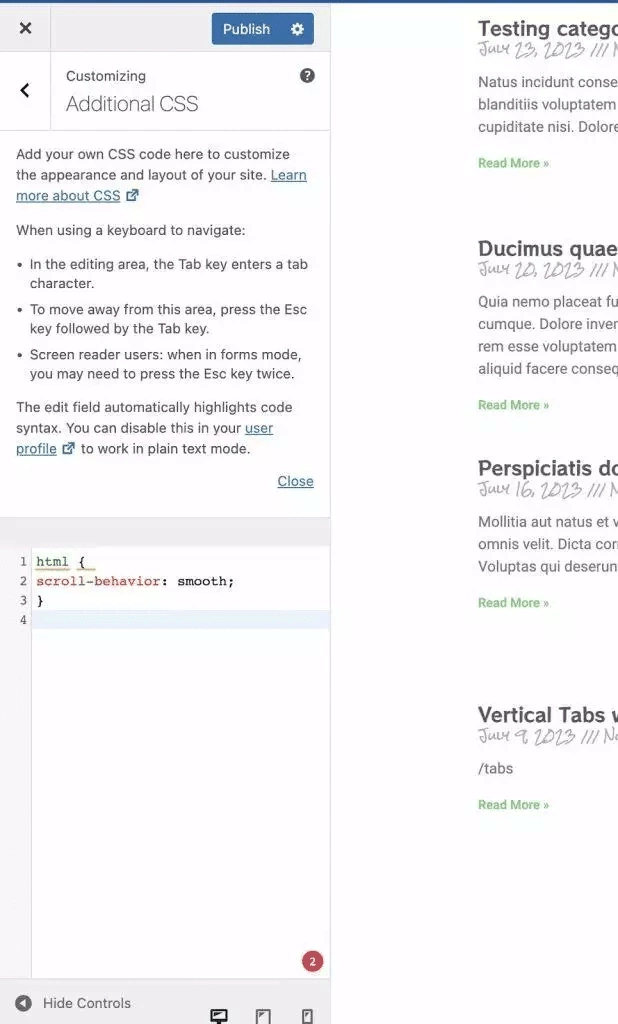
Simply add this code to the Custom CSS section of your theme to apply smooth scrolling globally across your entire website.
html {
scroll-behavior: smooth;
}
That’s it! You now have smooth scrolling anchor links set up in Elementor.
For even greater control and smoother scrolling effects, we recommend trying the Smooth Scroll widget from The Plus Addons for Elementor.

Snapshot: Customization Options in the Smooth Scroll Widget by The Plus Addons for Elementor.
Frequently Asked Questions
How to create a menu anchor in Elementor?
To set an anchor point, pick the section you want to link to. Go to the Advanced tab on the left side panel. Type a unique ID in the CSS ID box. Use only letters, numbers, hyphens, or underscores. Save and publish your changes.
How to link a button to a specific section in Elementor?
Add a button widget to your page. Select the button and find the Link area in the left panel. Type the page’s URL, followed by # and your anchor ID. Save the changes and publish your page.
How to use Elementor’s Menu Anchor widget?
Drag and drop the Menu Anchor widget where you want it. Enter a unique anchor name in the widget’s Anchor field. Save and publish the page. Then, add a menu item and choose the Menu Anchor link type. Finally, use the same anchor name for the link.
How to add a hyperlink to a column in Elementor?
Select the column you want to link. In the left panel, find the Link field. Enter the URL with a # and the anchor name. Save your work and publish the page.
How to link a menu item to a section in WordPress using Elementor?
Create an anchor ID for the section first. Add a menu item and choose Custom Link as the type. Type the full page URL plus # and the anchor name. Save and publish your menu changes.
How to add an anchor to a hyperlink in WordPress using Elementor?
Select the text or image to hyperlink. Locate the Link field on the left panel. Enter the URL plus # and the anchor name. Save and publish the update.