Your website’s navigation plays a key role in keeping visitors engaged. If your menu is messy or hard to use, people might leave quickly without finding what they need.
Creating a dropdown menu in WordPress can make your site easier to use. It helps organize your links neatly, so visitors can find content faster and enjoy a smoother experience.
Learn how to create dropdown menu in WordPress with our step-by-step guide, ensuring your site is both visually appealing and user-friendly.
Let’s get started!
Key Takeaways
- Good navigation improves user experience on your website.
- Dropdown menus help organize links clearly.
- You can build dropdown menus easily using WordPress tools.
What Exactly Are Dropdown Menus in Wordpress?
Dropdown menus let you group several links under one main menu item. This design helps keep your navigation clear and easy to use. You can build a main menu and add smaller links, or sub-items, that appear when users hover or click.
Benefits of using dropdown menus include:
- Clear structure: Similar links are grouped together.
- Better user experience: Visitors find things faster without a crowded menu.
- Cleaner design: Your site looks more organized and tidy.
How to Make a Dropdown Menu in WordPress?
Option 1: Use WordPress Default Menu Features
Step 1: Creating Your New Menu
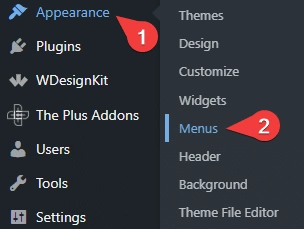
To begin crafting a fresh navigation menu, access your WordPress administrative area. From the dashboard, locate and click on Appearance, then proceed to select Menus.
Within this section, you’ll find an option to “create a new menu”. Click this link.

Next, provide a descriptive name for your menu, such as “Primary Navigation,” and then click the Create Menu button. Once your menu is established, you can assign it to a desired display area on your website by checking the relevant box under the theme location options.
Step 2: Add Your Menu Items
Now that your menu is set up, it’s time to add content. On the left side of the menu customization screen, you’ll find various content types, including Pages, Posts, and Custom Links.

Simply check the boxes next to the items you wish to include, then click Add to Menu. These selected items will then appear on the right, within your menu’s structure. You can also incorporate categories or custom URLs using the same straightforward method.
Step 3: Structuring and Arranging Your Menu
Once your menu items are in place, organizing them is a breeze. You can easily reorder them by using a drag-and-drop action to position them exactly where you want.
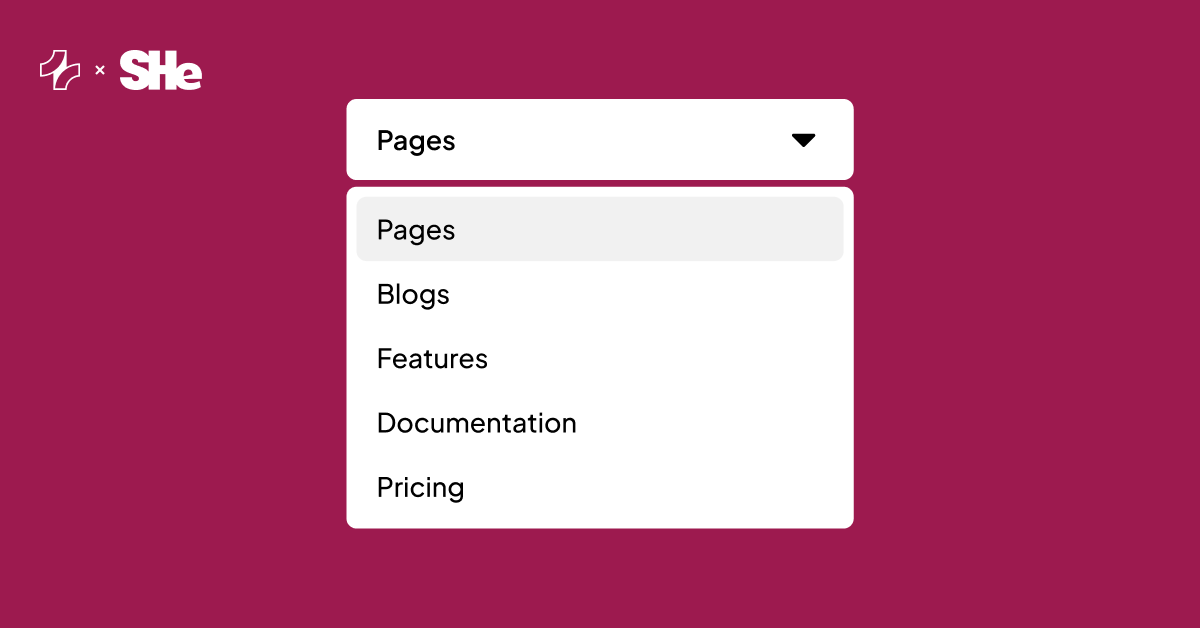
To create a dropdown (or “nested”) menu, simply drag a sub-item slightly to the right, directly underneath its intended parent item. This indentation will visually indicate that it’s a sub-menu item.

Don’t forget to Save Menu to apply your changes. A well-organized menu significantly improves user navigation, so consider placing your most crucial links at the top for easy access.
Option 2: Use WordPress Menu Plugins
Plugins can significantly simplify creating dropdown menus in WordPress. With the right one, you can customize your menus without writing a single line of code. Here’s how to choose, install, and effectively set up a dropdown menu plugin.
Step 1: Choosing an Appropriate Plugin
Begin by identifying a plugin that aligns with your specific requirements. Some widely favored choices include:
- Max Mega Menu: An excellent option for effortlessly building sophisticated dropdown menus.
- WP Mega Menu: User-friendly and provides extensive customization capabilities.
- Responsive Menu: Ideal for developing menus that adapt seamlessly to mobile devices.
Before making your decision, review user feedback and consider the number of active installations. To ensure optimal performance, select a plugin that receives regular updates and robust support. Furthermore, confirming its compatibility with your current WordPress version is vital to prevent any potential conflicts.
Step 2: Plugin Installation and Activation
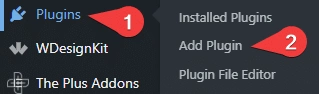
With your chosen plugin in mind, it’s time to get it set up. Head over to your WordPress dashboard and navigate to ‘Plugins’, then click ‘Add Plugin’.
In the search bar, type in the name of the plugin you’ve selected.
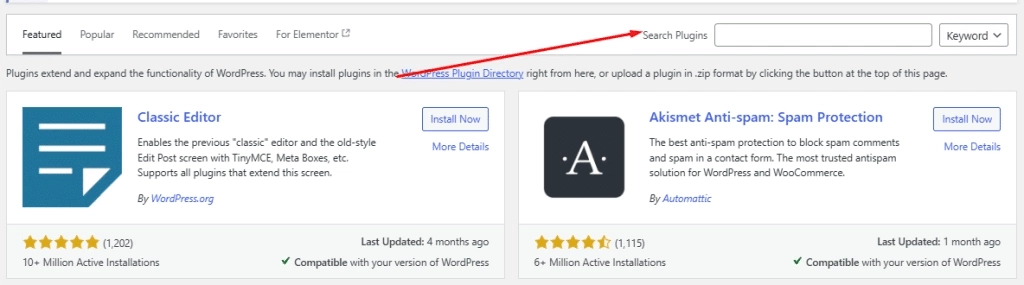
Once it appears in the results, click ‘Install Now’. After the installation is complete, click ‘Activate’.
Upon activation, you’ll likely notice a new menu option pop up in your dashboard. From here, simply follow the on-screen instructions to begin building and personalizing your dropdown menus. Most plugins provide real-time previews, letting you see your adjustments as you make them. Remember to save your settings after any changes to ensure your dropdown menu functions correctly on your website.
Option 3: Build Dropdown Menus with Navigation Block
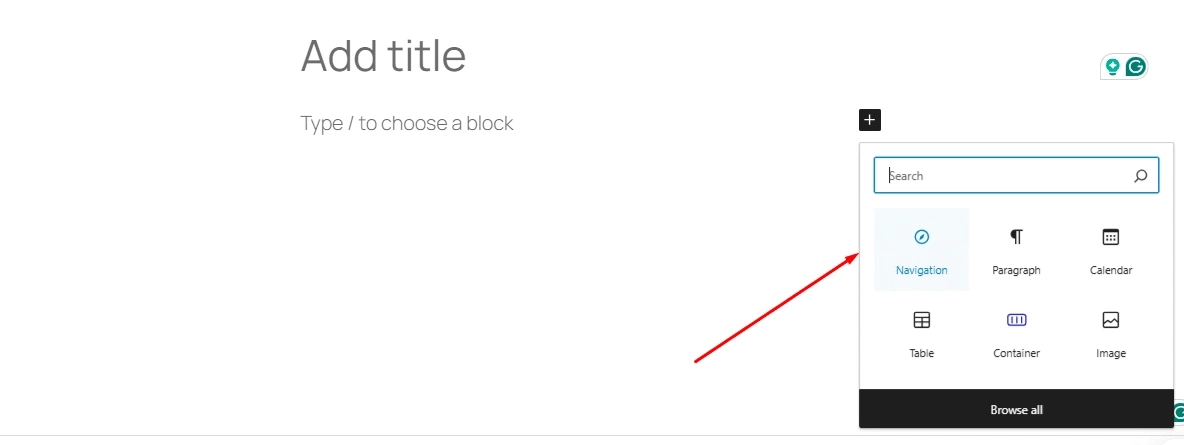
Open the page or post where you want the menu.
Click the + icon to add a new block. Search and select the Navigation block.
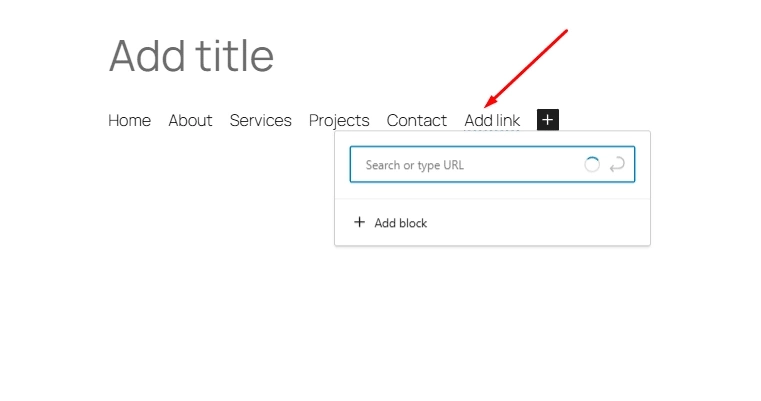
Press Add Link to add items, connecting them to pages, posts, or custom URLs.
To create a dropdown, select the navigation block, then pick a menu item.
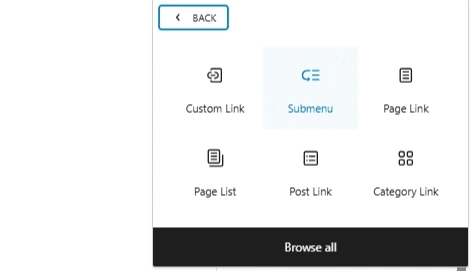
Add a submenu inside it by nesting links under that item.
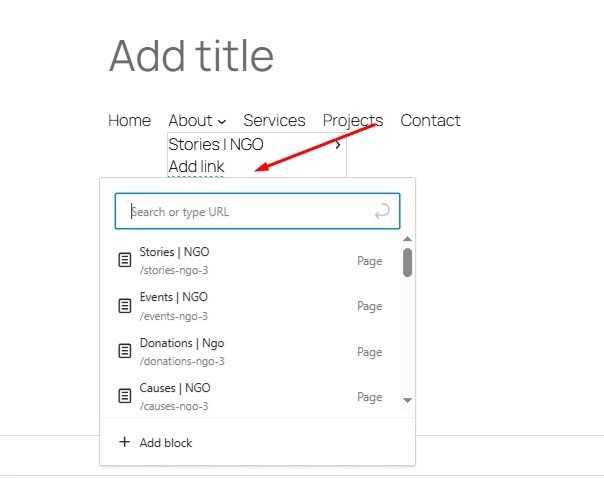
You can rename or change links by clicking the items. Drag items to reorder or nest them.
Once done, click Update or Publish to save your menu.
Your visitors will see a dropdown to help them navigate your site easily.
Wrapping Up
To make navigation easy for your visitors, focus on building a clear and well-organized menu. You can choose from several ways to create dropdowns, such as using WordPress’s Customizer, plugins, or the Navigation Block. Each option helps keep your site tidy and simple to explore.
For Elementor users, The Plus Addons for Elementor plugin offers a comprehensive suite of widgets specifically designed to enhance your website’s navigation with dropdown capabilities. These include, but are not limited to:
- Mega Menu for Elementor
- Mobile Menu for Elementor
- Navigation Menu
- Circle Menu Widget for Elementor and Many More
Tips to remember:
- Use clear labels for each menu item
- Group related pages under one dropdown
- Test menus on mobile devices to ensure they work well
This approach makes your site easier to use and more inviting to visitors.
Explore the complete list of 120+ widgets and extensions here. Start creating your dream website, no coding required!
FAQs on How to Create Dropdown Menus in WordPress
Do dropdown menus impact search rankings?
Dropdown menus can affect your site’s SEO if search engines can’t properly read the links inside them. Make sure your menu’s links are easy for search engines to crawl.
Can dropdown menus slow down my website?
Yes, if your dropdown uses a lot of JavaScript or heavy code, it might slow your site down. This can indirectly affect your SEO by making your pages load more slowly.
How can I change an existing dropdown menu in WordPress?
Go to your WordPress dashboard, then click Appearance > Menus. Pick the menu you want to edit. You can drag items to change their order or add and remove links. Don’t forget to save your changes.
Is it possible to have dropdown items without linking anywhere?
Yes. Use a custom link and put # as the URL. This creates menu items that don’t take visitors to another page but keep your menu neat.
How do I make a collapsible menu in WordPress?
Choose a theme or plugin that supports collapsible menus. Add the menu widget where you want it, like the sidebar. Then, turn on the collapsible option so users can open or close menu sections easily.