
Elementor Sticky Header: The Complete Setup Guide
Making an Elementor header sticky is a two-part decision: which tool sticks it, and what happens to it while the visitor keeps scrolling. Elementor Pro’s own sticky toggle handles the first part on Pro sites only. Sticky Header Effects for Elementor handles both parts, on Elementor Free or Pro, and adds 21 scroll effects on top of the sticky behavior itself. This guide walks through the actual setup, step by step, plus the specific things that go wrong.
An elementor sticky header is the foundation every scroll effect in this guide builds on top of; nothing else here works until this base setting is on.
Key Takeaways
- Sticky Header Effects for Elementor works on Elementor Free or Pro. Elementor Free has no native sticky setting, so this plugin is the only way to get one there.
- Setup is done entirely from the Elementor Advanced tab on your header section. No custom CSS or code is required at any step.
- 10 effects are free forever on unlimited sites. 11 more effects and 50+ templates require Pro, licensed per site. See the pricing page for current plans and any active promo code.
- Every effect can be set independently for desktop, tablet, and mobile, which is where most sticky-header setups actually go wrong.
- 300,000+ sites run this plugin today, version 2.2.2, requiring WordPress 6.3+ and PHP 7.4+.
Before You Start
You need a header built as an Elementor section or container, either through Elementor Pro’s Theme Builder or a header you have placed directly on a page. Sticky Header Effects for Elementor attaches to that existing header; it does not construct the layout itself, so build the logo and menu first. If you only need the navigation menu itself pinned in place, without any of the scroll effects below, the Plus Addons Navigation Menu widget has its own basic toggle for that: see how to create a sticky menu in Elementor.
You also need to confirm your site meets the plugin’s requirements: WordPress 6.3 or newer and PHP 7.4 or newer, per the current WordPress.org listing. Most managed WordPress hosts default well above both.
Step 1: Install and Activate the Plugin
Install Sticky Header Effects for Elementor from the WordPress.org plugin directory, the same way as any other plugin: Plugins, Add New, search, Install, Activate. No license key or account is required for the free tier; it downloads and activates directly.
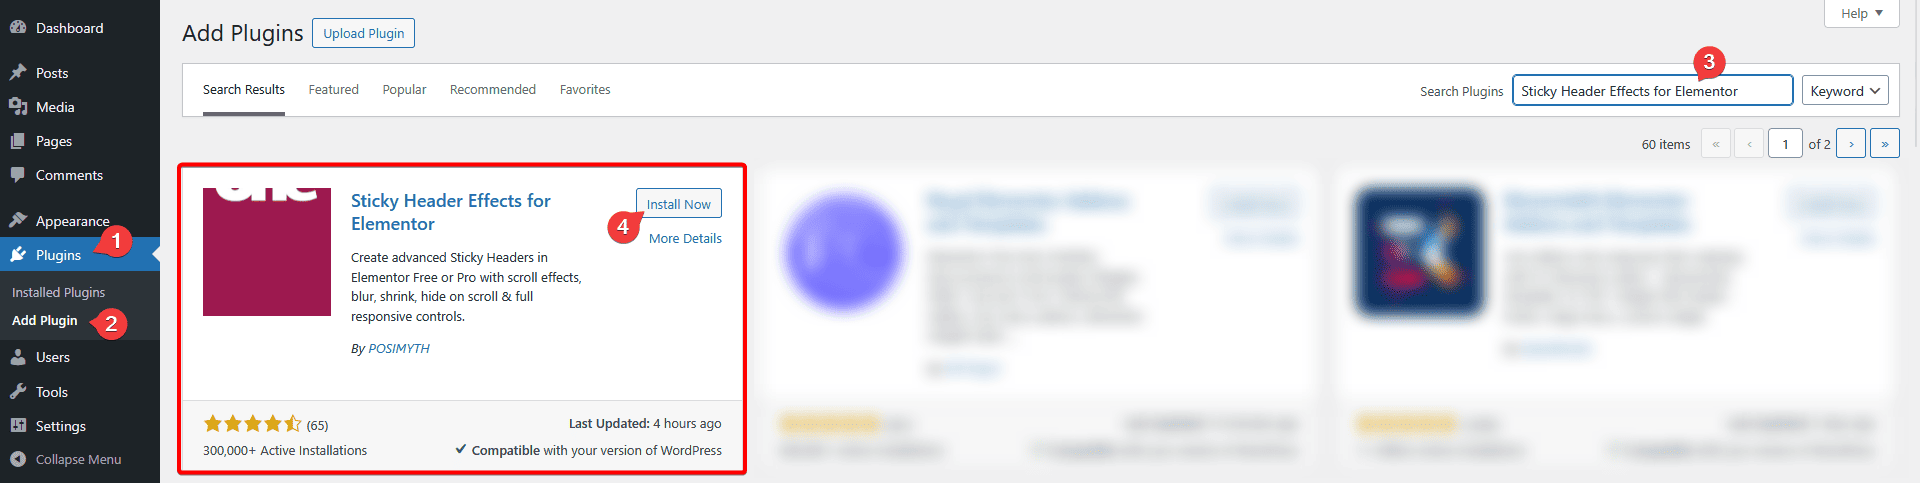
Step 2: Open the Header Section’s Advanced Tab
Edit the header (in the Theme Builder if you use Elementor Pro, or directly on the page if you do not) and select the section or container that wraps the entire header. Open the Advanced tab in the Elementor panel on the left. A new “Sticky Header Effects” control group appears there once the plugin is active.
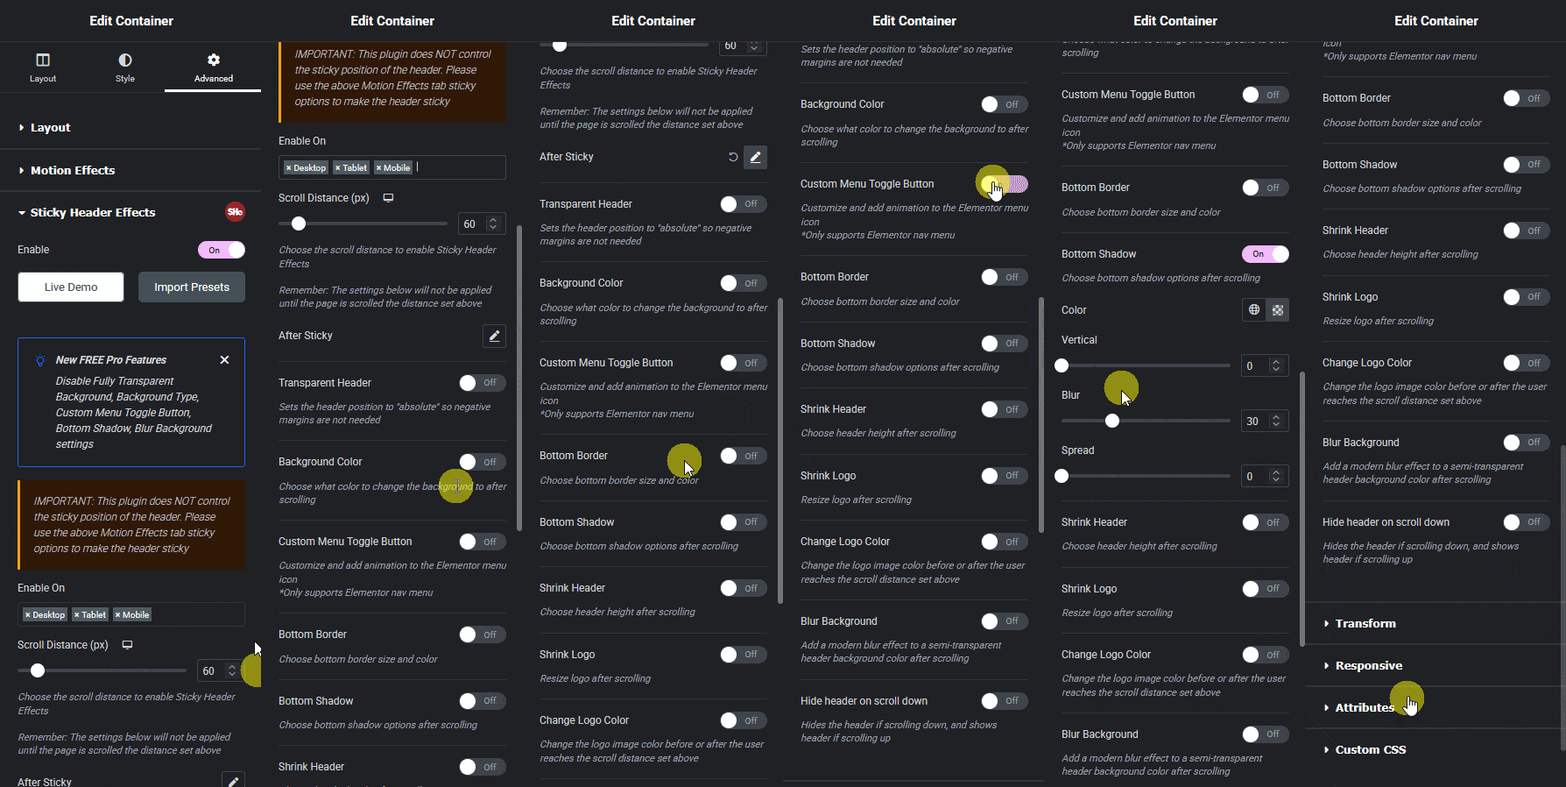
Step 3: Enable Sticky and Set the Scroll Distance
Turn on the sticky control first. This is the base behavior: the header stays pinned to the top of the viewport once the page scrolls past it. The Header Scroll Distance effect, one of the 10 free effects, controls how far the visitor has to scroll before anything triggers, which matters most on tall hero sections where you do not want effects firing immediately.
Set this distance in pixels, and check it on your actual hero height, not a guess. A short hero and a long hero need different values, and the same value copied across page templates with different hero heights is the most common reason a sticky effect looks like it is not working at all.
Step 4: Turn On the Effects You Actually Need
The 10 free effects are Header Scroll Distance, Transparent Header Background, Dynamic Background Color Change, Bottom Border Styling, Header Shrinking, Logo Shrinking, Logo Color Change, Blur Background, Hide Header on Scroll Down, and Above Header Section. Each has its own toggle and its own settings once enabled; you do not need to turn all 10 on to use any single one.
A typical setup for a header over a hero image is Transparent Header Background at the top of the page, switching to Dynamic Background Color Change once the visitor scrolls past the set distance. A typical setup for a tall page is Header Shrinking paired with Logo Shrinking, so the header takes up less vertical space once it is pinned.
Pro adds 11 more: Display Conditions, Sticky Until (Boundary Control), Reveal/Entrance Animations, Header Replace on Scroll, Logo Image Swap, Sticky Menu Styling, Extended Backdrop Filters, Background Image on Sticky, Header Opacity Transition, Logo Styling on Sticky, and Multi-Sticky Coordination, for all 21 effects total.
Step 5: Set Behavior per Device
Every effect has its own desktop, tablet, and mobile settings, accessed through Elementor’s standard responsive-mode icons at the top of the panel. This is worth doing deliberately rather than leaving mobile inheriting the desktop values, because a shrink effect sized for a wide desktop logo can crush a mobile logo into an unreadable size if left unchecked.
Test each breakpoint by switching Elementor’s responsive preview, not only by resizing a desktop browser window, since some mobile browsers handle sticky positioning differently during address-bar show and hide behavior on scroll.
Step 6: Preview and Publish
Preview the live page, not only the editor canvas, before publishing. The Elementor editor iframe does not always reproduce sticky scroll behavior identically to the rendered front end, particularly for Hide Header on Scroll Down, which depends on scroll direction detection that behaves more reliably outside the editor frame.
Two Real Problems, and What Actually Causes Them
Two setup mistakes account for most support requests on this exact feature set. Both are worth naming directly rather than leaving a builder to find them by trial and error.
The menu text color does not change, only the background does. Dynamic Background Color Change and Logo Color Change are separate effects with separate settings; turning on the background effect does not automatically apply a matching text color. Set the sticky-state text color explicitly under Logo Color Change (and the corresponding menu-item color control) rather than assuming the background setting covers it.
Turning on one effect appears to disable another. Some effect combinations, most often a background-on-sticky effect paired with a logo-swap effect, need to be configured in a specific order because they target overlapping elements. If an effect stops working the moment a second one is enabled, check whether both are trying to control the same element and adjust one of them rather than assuming either is broken.
Free vs Pro: What Setup Actually Changes
The setup steps above are identical on Free and Pro; Pro simply exposes 11 additional effect toggles in the same Advanced tab panel, plus 50+ ready-made templates that already have effects pre-configured, which is faster than building from a blank header if your target look matches one of them closely. Pro is licensed per site, backed by a money-back guarantee. Current pricing and any active promo code are on the pricing page rather than repeated here, since they can change.
Nothing in Free stops working if you never upgrade. The free tier’s 10 effects are supported on unlimited sites indefinitely; Pro adds capability rather than removing a trial period.
Frequently Asked Questions
Does this work without Elementor Pro? Yes. Sticky Header Effects for Elementor runs on Elementor Free, which has no sticky header setting of its own.
Will it slow my site down? Every effect runs on CSS transform and opacity only, per the developer’s own performance claim, which avoids the layout-recalculation cost that heavier scroll-JS implementations trigger, and keeps scrolling smooth at 60 frames per second even on phones.
Can I use different effects on different pages? Yes, since the settings live on the header section or container itself; a header used site-wide through the Theme Builder shares one configuration, while a header built per page can differ.
For the full effect list with live demos of each one, see the 21-effect grid. Setup detail for any specific effect, including exact field names, is in the documentation. For the mechanics of how CSS handles pinned-to-viewport positioning at the browser level, MDN’s position reference and the backdrop-filter reference (relevant to the Blur Background and Extended Backdrop Filters effects) are the primary sources. Current version, requirements, and rating are always live on the plugin’s WordPress.org listing.
Want the sticky header without the code?
Sticky Header Effects for Elementor drops in as a widget. Free plugin, no account needed.
